


Petalique Make - A - Long is on!
- Natalia Kononova
- 2 days ago
- 8 min read


Welcome to the Petalique Make-A-Long (MAL) - officially live today in collaboration with Scheepjes! Thank you so much for being a part of this. A huge thank you also goes out to every single person who contributed to making this event a reality!
Previous blog posts:
Youtube video (will go publicafter 8 am EST, July 1)
Make-A-Long Home
The MAL will take place in the official Scheepjes Facebook groups - an amazing community that offers incredible support at every stage of your project!
Join the groups here:
How to Participate
The event starts today, July 1st, 2026, and runs for four weeks until July 29.
Joining the fun is easy:
Grab your pattern: Purchase any qualifying pattern or bundle at a 20% discount (no code needed - the discount is automatically applied!).
Join the community: Head over to the official Scheepjes Facebook group(s).
Start making: Hook on your chosen project and dive right in!
Use the group to get inspired, ask questions, and share your progress and expertise with fellow makers. As the designer, I will be fully tuned in to help and guide you through the entire process alongside the wonderful group mods - a fantastic team that does so much to support both our members and designers!
The Participating Patterns
There are three beautiful patterns choosing from, available either individually or together in a bundle. For your convenience, each individual pattern page includes a direct link to the discounted 3-pattern bundle.
Each pattern includes:
Full written instructions & clear charts
Video tutorials for special stitches and the first 10 rounds to give you great momentum right from the start.
Step-by-step photos for finishing the bag flawlessly.
Want a sneak peek? Here is an example video showing Rounds 1–3 directly from the pattern:
1. Pillow / Wall Hanging Pattern
(Best with Scheepjes Whirl / Whirlette)
See Pattern Page for yarn requirements and buying options (Etsy, Ravelry).
Smaller Pillow: Smaller size, no border, with a clean double crochet back.
Bigger Pillow: Bigger size by just adding a border to a smaller pillow.
Wall Hanging: Essentially, we are framing the big pillow front because art belongs on walls (and crochet is art).


2. Bag / Pillow Pattern
(Best with Scheepjes Whirl)
See Pattern Page for yarn requirements and buying options (Etsy, Ravelry).
Bag: Make it a handbag or a shoulder bag just by changing the handle length. Requires lining sewing.
Double-Sided Pillow: Features the mosaic design on both sides, exactly like the bag.


3. Blanket Pattern
See Pattern Page for yarn requirements and buying options (Etsy, Ravelry).
Baby Size: Lightweight and sweet using Scheepjes Whirl / Whirlette.
Lap Size: Perfectly cozy using Cotton Whirl / Whirlette.
Throw Size: Big and squishy using Stone Washed / Stone Washed Flow.
Table Topper: Delicate and intricate using Maxi Sugar Rush yarn.


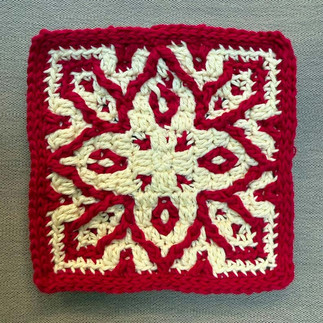
Practice Pattern (Last Day FREE!)
If you need a quick boost of confidence before diving into the main event, I designed a companion pattern that is perfect for trying out my overlay mosaic crochet technique! It’s a fun, fast, colorful, and completely stash-busting project.
These coasters are the perfect playground to practice the slanted and unique stitches featured in my designs before committing to a larger project.
Don't wait! Today, July 1st, 2026, is the very last day to grab this practice pattern for free.


Here is how you can download your copy right now:
Option 1 (Direct Download): Click the link right here below to download the PDF instantly.
👉 DOWNLOAD PETALIQUE COASTERS PDF in English:
👉 DOWNLOAD PETALIQUE-ONDERZETTERS-PDF in het Nederlands:
Option 2 (Ravelry or Etsy): If you prefer to keep your patterns safely stored in your Ravelry Library or Etsy orders:
👉 Coasters pattern on RAVELRY (use code PETPREP for free download)
👉 Coasters pattern on Etsy (use code PETPREP for 75% off $0.62 - Etsy doesn't allow free downloads)
After July 1st, this pattern will return to its regular price. Pattern page:
The pattern received a lot of love in the last week since it was published! Here are some of the projects (with maker names if you click on the gallery):


What Makers Are Saying
I couldn't resist sharing some of the wonderful feedback the coaster pattern has already received! Here is a sneak peek at what crafters are saying over in our Facebook community:
Hailey Perlitz-Young:
Mosaic crochet is crazy. Getting the hang of SC BLO, long stitches FLO broke my brain at first. But I kind of love it. And you can make such pretty patterns.
Janey Narewska:
Still to get going properly with my FOL or I would be seriously tempted by the new MAL 😎😊
Femke van der Poll:
I enjoy making them so much and they look so bright and cheery, that I've decided I am making them for this years teachers gift.
Liz Judge:
It was so much fun to make and it’s so cute. It measures perfectly to the gauge in the pattern so hopefully that’s a good sign for the upcoming MAL.
Fran Cine
Tadaaaa! 🥁🎺. Het is gelukt! Vandaag ook nog een paar keer stukken uitgehaald. De aanhouder wint 😄. (Ta-da! 🥁🎺 We did it! I even managed to get a few pieces out today. Persistence pays off! 😄)
Susan Fy
My first completed mosaic crochet❤️ Thank you for the pattern! Looking forward to the Petalique MAL❤️
Wait, Another Project??? 🤔
Haha, don't worry - I promise I didn't write a whole new pattern this time! But I did think of another fun way to use the collection: a small rug or a beautiful table topper!
The Table Topper Variation
One of our amazing pattern testers, Monica Bianchini, created a stunning table topper version using the blanket pattern worked in a lace-weight yarn (Scheepjes Maxi Sugar Rush). Dropping down to a fine thread completely transforms the design!
Yarn used: Scheepjes Maxi Sugar Rush (Lace weight)
Finished Size: 72 cm (28 ¼")

Alternatively, you can create a smaller table topper simply by making Sections 1 and 2 of the blanket pattern - no lace-weight thread required! Here is a beautiful example made by Catou La using this exact method.
If you use Scheepjes Whirl or Whirlette, the finished size is approximately 53 cm (20 ¾").
Here is the estimated yarn breakdown you will need:
Total:
275 g (including 150 g of background color and 125 g of contrasting color)
Distributed by section:
For Section 1 you will need:
Background (BG): 75 g, Contrast (CO): 75 g
For Section 2 you will need:
Background (BG): 50 g, Contrast (CO): 67 g

The Rug Variation
If you’re tempted to give the rug idea a go, I highly recommend using the Blanket pattern to do it. There is an important difference in the inner square border between the blanket and the pillow/wall-hanging versions that makes a big structural difference for a floor project:
Pillow & Wall Hanging: The inner border is just a single round of sc in a contrasting color. I had to keep it narrow so the finished piece would fit perfectly inside a 50 cm (20") IKEA frame.
Blanket: Since I didn't have any size restrictions, I went all out with a full, sturdy border! It features three robust rounds: an sc foundation round, an sc background color round, and a dc round worked directly into the foundation.
Because of those extra rounds, the blanket pattern will give you a much cleaner edge and the extra weight needed for a beautiful little floor rug!

Yarn Recommendations & Yardage Calculations
Sturdier and heavier cotton yarns like Scheepjes Cahlista, Softfun, Mighty, or Bloom are fantastic options for creating a rug.
Read below to learn exactly how to calculate the amount of yarn you will need. This is a handy method you can use for any of your future crochet projects, too!
How to Calculate Yarn Amounts for a Different Yarn
If you want to use a different yarn weight for your rug (or any other project), you can easily calculate exactly how much yarn you'll need. All you need is a small amount of your chosen yarn to make a test swatch!
Here is the foolproof step-by-step method:
Make a Swatch: Using your chosen yarn, crochet an overlay mosaic gauge swatch that is 20 stitches wide by 20 rows high (using the swatch instructions provided in your Petalique pattern).
Weigh Your Swatch: Use a kitchen scale to find the exact weight of your swatch in grams.
Find Your Coefficient (C): Divide your swatch weight by 4.5 (which is the weight of the exact same swatch made in Scheepjes Whirlette).
Formula: Your Swatch Weight / 4.5 = Coefficient (C)
Multiply Your Yardage: Multiply the original pattern's yarn requirements by your Coefficient (C) to get your new required amount.
Example Calculation:
Let's say you are making a rug using Sections 1 and 2 of the Blanket pattern, and your test swatch weighs 8 grams.
Your Coefficient (C): 8 g ÷ 4.5 g = 1.8
Now, apply that 1.8 multiplier to the original Scheepjes Whirl/Whirlette requirements:
Section 1 (Rounds 1–57):
Background Color (BG): 75 g × 1.8 = 135 g
Contrast Color (CO): 75 g × 1.8 = 135 g
Section 2 (Inner Border, Rounds 58–74):
Background Color (BG): 50 g × 1.8 = 90 g
Contrast Color (CO): 67 g × 1.8 = 121 g
Starting Your Petalique Project
The best part? You don't need to read anything before jumping in!
The pattern includes video support for the first 10 rounds to set you up for success. Regardless of which of the three projects you are making, we will all be following the exact same instructions for the first 56 rounds.
Simply grab your yarn, start with Round 1, and press play on the video for Rounds 1–3. I will explain all the rules and techniques directly in those videos!
If you forget a rule after Round 10, don't worry - you can always look back at the pattern notes or ask for help in our Facebook group. If you ever need a quick refresher on how to execute a specific stitch, there is a dedicated Stitch Library in the Appendix at the end of the PDF, complete with video links and timestamps for every single stitch.
Special Stitches
All special stitches used in this pattern can be found in the Appendix at the end of each PDF.
To keep the fabric looking incredibly neat, I like to create certain decreasing stitches a bit differently. I use custom, "skinny" versions of standard decreases:
dec – A skinny version of 2 double crochet together (dc2tog)
/dec – A skinny version of double crochet (dc) and extended double crochet (edc) together (there are less than 10 such stitches in each pattern)
\dec – A skinny version of extended double crochet (edc) and double crochet (dc) together (again - a rarely appearing stitch)
💡 A Quick Note for a Stress-Free Make: If learning these unique stitch variations feels a bit overwhelming right now, don't worry! You can always substitute them with regular, standard decreases instead. Your project will still look absolutely beautiful, and it won't negatively impact the overall appearance of your work at all.
Stress-Free Corners
I mention this in the first video, but it is definitely worth reminding you here: keep your corner chains loose! This makes it so much easier to find their front loops in the next rounds. If you are still struggling to spot them, simply place a stitch marker into the front loops of the two corner chains as you go.
Front Post Stitches
There are many tall front post stitches in this pattern, and it can be tricky to maintain perfect tension for them - sometimes the final two loops will look a bit loose. Don't stress about making them look perfectly uniform! A later front post stitch will actually be worked right over that stitch, completely hiding those loose loops from view.
Hooks up, let's begin! 🧶
Social Sharing
When you share your beautiful work-in-progress (WIP) photos on social media—and I truly hope you do!—don't forget to use our official hashtags so the whole community can follow along:
👉 #ScheepjesMAL and #PetaliqueMAL
You can also tag me directly @outstandingcrochet so I can see, admire, and share your gorgeous stitches!
I am so excited for you to join the fun and hope you absolutely love making your Petalique project. Keep your eyes peeled for more blog posts coming your way soon! 💖
Happy crocheting,
Natalia


Comments