Outstanding Crochet
Crochet Patterns by Natalia Kononova
You can opt out by clicking "Unsubscribe" link in a newsletter.
View our Privacy Policy.
Yarn
Crochet Tools
Yarn
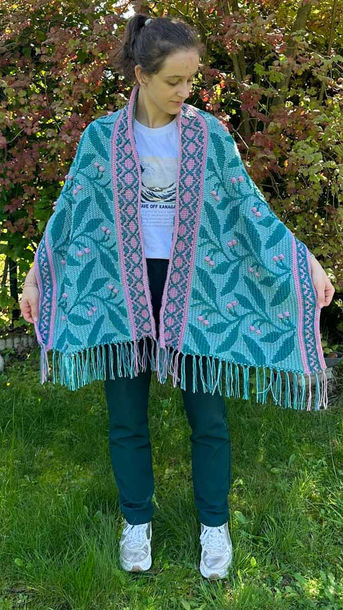
Forager Ruana/ Shawl MAKE ALONG
Launch

Previous posts:
-
October 25: Week 4
-
October 18: Week 3
-
October 11: Week 2
-
September 27: Gauge swatch, Joined Double Crochet
-
September 15: Yarn Amount Calculation for Different Color Layouts
-
September 13: Announcement
Get the pattern with 20% off October 4 - 25:
So many messages filled with 'can't wait' and 'Is it October 4 already?' flooded the groups, and they truly got my heart racing with excitement and just a hint of nervousness. But you know what? Today is the day! It's honestly incredible to think that I've been gearing up for this moment since the beginning of October 2022! :))
Let me take you on a quick tour of my journey, from the initial sketching and swatching to the final ruana. It's been a whole year of hard work, alongside many other patterns. This journey included starting with a rough sketch, crafting a seamless branch design, creating a chart, swatching a single branch, visualizing how it would fit into the larger design, then tackling the entire panel without cropped leaves on the sides and realizing it needed to be frogged and redone. Finally, it led to the two blocked pieces now drying out on my balcony (fun fact: I'm using my camping rugs for this; here comes the first crochet tip for those who love multi-functionality).

The Make Along takes place in the official Scheepjes Facebook groups:
In the groups, you can share your work, view the progress of other members, receive support from the designer, your crochet buddies, mods, and admins, and access any additional resources I may share during the MAL!
Grab the pattern:
-
With 20% discount ($4.39*) during the MAL (4-25 October 2023) on Ravelry or Etsy. *VAT and US sale and use taxes apply.
-
Languages: English and Dutch
-
Included: written instructions in US terms, schematics, charts, videos for all parts.
Check out our team gallery:
See ruana in action (wind to 1:11 time mark):
Feel free to use our affiliated yarn links (we receive a small commission from the seller at no additional cost to you; these links are also included in the above PDF's):
Scheepjes Scrumptious:
Wool Warehouse (UK, US)
Jimmy Beans (US)
Caro's Atelier (Nederlands)
BreiWebshop.nl (Nederlands)
Knitkat (Belgium)
Scheepjes Colour Crafter:
LoveCrafts (UK, US)
Jimmy Beans (US)
Caro's Atelier (Nederlands)
BreiWebshop.nl (Nederlands)
Knitkat (Belgium)
Scheepjes Our Tribe:
Wool Warehouse (UK, US)
LoveCrafts (UK, US)
Caro's Atelier (Nederlands)
BreiWebshop.nl (Nederlands)
Knitkat (Belgium)
Your Progress:
Just last week, I shared a video to help you become more comfortable with my overlay mosaic crochet style and charts. I also presented the choice between joined double crochet and regular double crochet, offering some crochet versatility.
The response was fantastic! Many of you promptly accepted the challenge and got to work.
Here's a collection of all your impressive swatches. Well done, everyone!
If you happened to miss that post, you can catch up with it HERE. Let's keep the crochet journey moving!
Narrow Border:
We're embarking on the journey of creating the shawl or ruana panel today (the first of two), and it all begins with a Narrow border. The length of the foundation varies depending on whether you're crafting a shawl, which is longer to allow space for two more branch repeats, or a ruana panel.
But before we dive in, let's equip ourselves with some useful tips. Afterward, you can follow the instructions provided in the pattern, which include both written instructions, the same videos, and charts to cater to your preferred learning style. 🌿

Rows 1-4:
Tips for Success:
Foundation cord:
-
Start with a foundation cord and ensure you reserve a tail that's approximately three times the width of your project. Alternatively, you can create the cord from two skeins: reserve 19cm/ 7 1/2'' tails, make a slip knot with both ends, and proceed making the cord (see the second video below). Once you've completed the foundation cord, you can cut one of the ends.
-
Consider using a hook that's one size larger for the foundation cord. For instance, if you're using a 4mm hook for your project, opt for a 4.5mm hook for the foundation cord.
-
I vividly recall the time I embarked on making a foundation cord of 200+ stitches without using markers. Trust me, it's an adventure you'd rather avoid. Lesson learned! Even without distractions, our minds tend to wander. Markers are your saviors here. I recommend marking at least every 50th stitch of your cord; that's about the extent of my attention span! Keep those markers handy. Did I mention how important they are? :)) Ah, yes, about 3 times in this paragraph.
-
Keep in mind that you can make adjustments to the length of your project if needed. This can come in handy, especially if your gauge differs. Calculate the desired length using your gauge and add or subtract a multiple of 32 stitches. Adjusting by 32 stitches will change the length of your shawl or ruana panel by approximately 16cm or 6 1/4 inches.
Length adjustments:
(Zie Nederlandse instructies na het Engels)
Before proceeding to the foundation cord, this paragraph provides instructions for the number of foundation stitches and Round 13 of the Body in case you make length adjustments.
Ruana:
1 more branch:
Foundation: 293sts + 32sts (325sts).
Inc Row 13 (+25sts): with Yarn2 (body background color): Bsc, 5sc, [sc2inc, 12sc]x24, sc2inc, 5sc, Bsc. (325+25=350sts)
2 more branches:
Foundation: 293sts + 64sts (357sts).
Inc Row 13: volg de instructies voor de schouderdoek.
1 less branch:
Foundation: 293sts - 32sts (261sts).
Inc Row 13 (+23sts): with Yarn2 (body background color): Bsc, 8sc, [sc2inc, 10sc]x22, sc2inc, 8sc, Bsc. (261+23=284sts)
2 less branches:
Foundation: 293sts - 64sts (229sts).
Inc Row 13 (+22sts): with Yarn2 (body background color): Bsc, 3sc, [sc2inc, 9sc, sc2inc, 10sc]x10, sc2inc, 9sc, sc2inc, 3sc, Bsc. (229+22=251sts)
Shawl:
1 more branch:
Foundation: 357sts + 32sts (389sts).
Inc Row 13 (+27sts): with Yarn2 (body background color): Bsc, 5sc, [sc2inc, 13sc, sc2inc, 14sc]x13, sc2inc, 4sc, Bsc. (389+27=416sts)
2 more branches:
Foundation: 357sts + 64sts (421sts).
Inc Row 13 (+28sts): with Yarn2 (body background color): Bsc, 7sc, [sc2inc, 14sc]x27, sc2inc, 6sc, Bsc. (421+28=449sts)
Nederlands:
Lengte aanpassingen:
Voordat je doorgaat naar de basisopzetrij, bevat deze alinea instructies voor het aantal opzetsteken en Rij 13 van het Middenstuk in geval van lengteaanpassingen.
Ruana:
1 extra tak:
Basisopzetrij: 293s + 32s (325s).
Meerd Rij 13 (+25s): met Kleur2 (achtergrondkleur mid): Rv, 5v, [v2meerd, 12v]x24, v2meerd, 5v, Rv. (325+25=350s)
2 extra takken:
Basisopzetrij: 293s + 64s (357s).
Meerd Rij 13: volg de instructies voor de sjaal
1 tak minder:
Basisopzetrij: 293s - 32s (261s).
Meerd Rij 13 (+23s): with Yarn2 (body background color): Rv, 8v, [v2meerd, 10v]x22, v2meerd, 8v, Rv. (261+23=284s)
2 takken minder:
Basisopzetrij: 293s - 64s (229s).
Meerd Rij 13 (+22s): with Yarn2 (body background color): Rv, 3v, [v2meerd, 9v, v2meerd, 10v]x10, v2meerd, 9v, v2meerd, 3v, Rv. (229+22=251s)
Omslagdoek:
1 extra tak:
Basisopzetrij: 357s + 32s (389s).
Meerd Rij 13 (+27s): with Yarn2 (body background color): Rv, 5v, [v2meerd, 13v, v2meerd, 14v]x13, v2meerd, 4v, Rv. (389+27=416s)
2 extra takken:
Basisopzetrij: 357s + 64s (421s).
Meerd Rij 13 (+28s): with Yarn2 (body background color): Rv, 7v, [v2meerd, 14v]x27, v2meerd, 6v, Rv. (421+28=449s)
Row 2:
-
Be prepared for a bit of a marathon! This row consists of a series of joined double crochet stitches. It's a rather long row, so consider preparing some treats or something that keeps you calm and happy. I highly recommend a quick foot massage break after every 50 stitches, for instance, so consider teaming up with your partner. Remind them that this ruana fits two! :))
Now, I know the temptation might be there to switch to regular double crochet for this row, but trust me, I strongly advise sticking with the joined option. It might seem like a detour, but it's your best friend in preventing the border from curling to the right side. Trust me, it's the way to go!
Row 3:
-
Remember to place markers in every 8th stitch, starting after the first marked stitch. If you run out of markers and can't place them in every 8th stitch throughout the entire row, don't fret. You can make adjustments in Row 5 by shifting the marker to the next 8th stitch after completing a stitch in the marked stitch.
Now, just to give you some context, markers weren't initially included in the instructions, and trust me, I learned this the hard way when dealing with hundreds of stitches in a row. These markers become particularly important for Row 5, which we'll delve into in more detail in the next paragraph.

Row 5:
Row 5 might seem like it's trying to play mind games with you, but don't worry! Even though this combination of stitches "V /\ V /\ V /\ V" can be a bit tricky for the mind to grasp, as long as you follow the instructions carefully and use the markers placed in Row 3, you'll be just fine. Just remember to mark every 8th single crochet from Row 3, and you'll navigate this row like a pro. :)

Body:
Joined double crochet:
-
By now, you've probably made your choice between using joined double crochet or regular double crochet for the body background. If you're still unsure about which one to go with, I have a special post where I explain the pros and cons of both options, and you can check it out HERE.
-
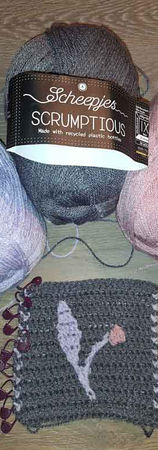
Since I wrote that post, one of our testers, Lauren Wolf, completed a panel of her second ruana, in which she opted for regular double crochet. In the second image, you can see two swatches: one made with joined double crochet (the lower one) and the other with regular double crochet, crafted by our group member Mary Sheets. A big thank you to Lauren and Mary for sharing these images! Hopefully, these visuals will help those who are still undecided about which background double crochet option to choose. :)


Increases in Row 13:
-
When you begin the Body with Row 13, you'll be instructed to increase a few stitches. This step is important because the Narrow border and Body have different gauges. As you work through the next few rows, you might notice that your piece is becoming slightly wider than the border, but don't worry; this discrepancy will even out after a few more rows.
Remember, if you made any length adjustments to the Narrow border, be sure to modify the number of increases accordingly. In Row 13, add 1 stitch or deduct 1 stitch for each 32-stitch change you made to the Narrow border. This will ensure that your Body aligns properly with your adjusted border. :)
Abbreviations:
-
If you encounter a stitch you are not familiar with, check Standard Abbreviations at the beginning of the pattern and Special Abbreviations before the Narrow Border instructions.
Uneven sides:
-
Due to the multiple decreases and increases in stitches, the sides of this project may not appear perfectly straight. However, you'll find that this effect tends to diminish after blocking. :)
Ready to start:
Now, armed with all this knowledge, you're all set to begin! I'm absolutely certain that you'll fall in love with your ruana or shawl, just as I have. It's such a versatile piece that'll keep you cozy throughout the upcoming winter. And the best part? You can wear one panel of your ruana while you work on the second one! How fab is that? :))
Let's stay in touch and keep the crochet community buzzing. Share your progress in the Scheepjes Facebook groups. Our next post is scheduled for October 11th. I can't wait to see some beautiful borders and maybe even a few leaves by then!
Warmest wishes,
Natalia :)


