Outstanding Crochet
Crochet Patterns by Natalia Kononova
You can opt out by clicking "Unsubscribe" link in a newsletter.
View our Privacy Policy.
Yarn
Crochet Tools
Yarn
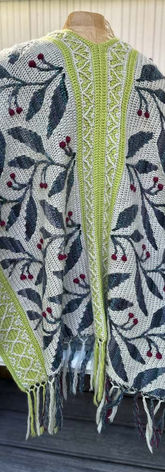
Forager Ruana/ Shawl MAKE ALONG
Week 2: Our Progress, New Videos and Techniques, Secret Forager Project,
Pattern Corrections, and More

Previous posts:
-
October 25: Week 4
-
October 18: Week 3
-
October 4: Launch
-
September 27: Gauge swatch, Joined Double Crochet
-
September 15: Yarn Amount Calculation for Different Color Layouts
-
September 13: Announcement
The Make Along takes place in the official Scheepjes Facebook groups:
Get the pattern with 20% off October 4 - 25:

One week progress
Hey there,
One week in and it's time for an update on our adventure with this project. It's been quite the rollercoaster on a full spectrum of challenging, but hey, that's what makes it interesting, right? We're tackling it one row at a time, and I'm determined to bring you along for the ride, whether you're willing or not! :))
My heart does a little happy dance every time I see someone making the leap from the Narrow border to the Ruana/Shawl body. Because I know it only gets easier from there! Those first few rows teach you all the stitches, and then it's all about watching branches grow, leaves unfurl, and berries ripen.
Check out our project board (I hope I've corralled all the projects from the groups). If I've missed anyone, just give me a holler! I am so proud of your progress!
Keep stitching and having fun! I promise, it's going to get easier with every stitch. :))
Caught in the Forager frenzy: my secret project unveiled!
It looks like I caught the make-a-long bug from the group and kicked off my own Forager project! I'm keeping it all hush-hush for now because I'm not entirely sure how it's going to turn out, but you know me – I'm all about wearables! I kind of regret not using the yellow for the border contrast, but might bring in on for the wide one!
I've got my hands on some Scheepjes Terrazzo yarn in a delightful palette: 720 Sangria, 765 Guscio d'uovo, 710 Pera, and 706 Paglia.

New videos
In my pattern designs, I typically aim to include only the essential videos that showcase all the stitches and techniques, while emphasizing the importance of following written instructions. However, while closely observing the wonderful members of our group, I've come to a delightful realization. There's a genuine need for a bit of extra visual guidance, particularly when it comes to Rows 6-9.
Once I created these videos, I promptly shared them within the Scheepjes groups to help ease the struggles of our adventure-takers. However, please remember that you can always return here, and I will keep the pattern updated with these valuable new resources.
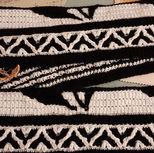
Alternative start for Narrow border:
Making only one row instead of two in foundation cord
While I absolutely adore the neat professionally looking edge of the Narrow border created by using a foundation cord (fnd cord) and Rows 1 and 2 worked into its back and front loops, a method I learned from our tester Karin Terpstra, I've come to realize that it might pose a challenge for some. If you find yourself feeling a bit defeated by the fnd cord, especially when working with a dark color and struggling to distinguish the front and back loops, fear not! There's a handy shortcut for this, tried and tested by our very own tester, Lauren Wolf. It yields a result that looks almost as good, with just one extra row added to the mix.
Row 1: with Yarn1 and a bigger hook (1 size/0.5mm bigger than the hook for the rest of the project) leave a tail (19cm/ 7 1/2'' throughout), make a chain foundation or fnd cord (mark each 50th st to prevent loosing count), turn, switch to a regular size hook, ch1, and work sc in each st (in back ridges/ humps at the back of ch's or in booth loops of the fnd cord. Fasten off, leaving a tail.
Row 2: with Yarn1 Bsc (border sc in first sc from prev row), sc blo (in all sc to last sc), Bsc (in last sc).
Row 3: with Yarn1 Bsc (border sc in first sc from prev row), joined dc flo (in all sc from Row 1 to last sc), Bsc (in last sc).
Proceed to Row 3 of the Narrow border.
Drawbacks of this method:
-
The chain foundation is less stretchable and may cause the edge to contract.
-
It adds one extra row to the project.
- The single row made in the foundation has a slight tendency to stand up and curl towards the right side
Take a look at the examples of the two methods in the picture:

Here is also a video for a foundation cord without the x3 project width tail:
Extended double crochet
In one of the videos, I mentioned that there was no symbol for the extended double crochet (edc), and I stand corrected thanks to one of our members – a big thank you for that!
Guillaume Schoonderbeek kindly sent me a screenshot from "The Crochet Answer Book" by Edie Eckman, which illustrates the extended double crochet as follows. I also came across the abbreviation EXdc for extended double crochet in another source.
Upon further reflection, I remembered seeing that symbol before, but I realized I couldn't use it because the chain symbol at the base of the double crochet made the front post extended double crochet (FPedc) symbol a bit too crowded. As much as I appreciate the crochet knowledge passed down by those who came before us, sometimes a little adjustment is needed. For now, I've taken the liberty of creating these symbols for my patterns, but I would love to hear your opinion on the best symbol for the extended double crochet or other extended stitches. :)
By the way, I have a video-tutorial for more extended crochet stitches (see below).

Embrace Oops Moments
Keep the Perfectionist Struggle at bay
Oh, the days of being a self-proclaimed perfectionist who couldn't do anything perfectly! I mean, when you think about it, that statement doesn't exactly scream "logic," does it? By the way: the picture of me nearly encountering a pond behind me is one of the unlucky 90% that usually don't survive my ruthless deletion spree. Wearing heels for a photoshoot when you never wear them in real life is not a good idea, by the way. :)) The things we do for the perfect shot, right?
But I always keep one such image from each batch to chuckle at myself and fend off the Perfectionist Syndrome.

Crafty Crochet Hacks: Turning Oops Moments into Oh-So-Clever Solutions!
Striving for perfection is like chasing a unicorn; it's just not possible. Even Mother Nature herself makes trillions of mutations in a single human body every day! So yeah, I do make an extra stitch from time to time. But do I always frog and start over? Not really. Sometimes, I'll sneakily work one stitch into two stitches at once. And sure, I might miss a stitch now and then. But here's my secret solution: the trusty treble crochet in the fourth row down through a loop in the second row down technique. You know: yo, insert hook in the loop from the second row down, yo again, insert hook in the loop from the fourth row down, and voila! You've just fixed a mistake in two double crochet rows at once. :))
So, here's the deal – it's absolutely okay to patch things up sometimes and not give yourself a hard time. Treat yourself like you'd treat your best friend – with a little kindness and a good laugh.
After all, it's the quirks and imperfections that make life fun, right?
Pattern corrections and additional materials
I make mistakes in my patterns sometimes, especially after the pattern has been tested. It's like just a night before the pattern launch; you suddenly get a ton of ideas on how to improve the instructions and end up messing them up along the way. :))
By the way, all corrections are being posted to the pattern page.
There is a link in the pattern to check for updates and it's a good practice to revisit it periodically. For Ravelry buyers, I send updates directly. If you purchased your pattern on Etsy, where sending updates to all buyers isn't possible, please check the update list on the pattern page before starting. If you find you need an update, don't hesitate to message me, and I'll be happy to assist.
Testers gallery
I wouldn't be able to do it without our fabulous testers!
Big shout-out to:
Alison Platt
Arlene Bort
Barbara Dobrska
Bianca Vernaleken
Joyce Richardson
Karin Terpstra
Lauren Wolf
Linda Toering
Lorene Hardie
Monica Bia
Yannic Helsen
Thank you!!!
Thank you for being such an awesome team, everybody!
Next blog post is coming October 18.
Stay in touch via the official Scheepjes Facebook groups:
Happy crocheting!
Natalia


